Our customer support is available 24/7:
How To Write A Check - The Full Guide
Knowing how to write a check is an important life skill to have. While it might not seem as necessary in an age of online banking that keeps moving further and further away from physical transactions, there are still many situations where you'll need to write a check. However, because having to fill out a check is nowhere near as common as it used to be, many people have no idea where to even start.
That's why we've made this guide to help clear things up a bit. In this article, we'll take you through everything you need to know about how to write a check. We'll look at how checks are laid out, as well as the proper way to fill in all the information necessary for the check to function properly. We've also included some handy tips and tricks that will help you keep your money safe when you fill out a check.
So without further ado, let's get started!
Also read: Get The Insights - How To Get A Business Loan With No Sweats!
How Are Checks Laid Out?
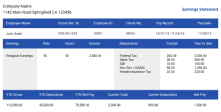
Before you can start filling out a check, it's important to know what the format of a check actually is. If you've never used a check before, they can be confusing to look at. A check has a lot of information on it, as well as several spaces that you'll have to fill in yourself. Here is a breakdown of each part of a check.
First, let's cover the parts that are already filled out. When you get a check or checkbook from your bank, it will come with some information already listed. This makes the checks unique to you, and means that you don't need to fill in all your account information every time you're making a payment with a check.
At the top-left of the check, there is some basic information about who you are and your account. This includes your name and the address which your account is registered for. A bit below that will be the bank's information, typically consisting of its contact details and sometimes a logo. The bottom of the check contains several long numbers:
These are: the bank's American Banking Association/ABA routing number (which tells banks where the funds will be taken from).
Your personal bank account number, and the check number (which is an anti-fraud measure that is unique to each payment).
The ABA number and check number are also found in the top-right corner of the check as an additional safety measure, and are typically put in a different format here.
The rest of the check consists of parts that you will need to fill in yourself when you write the check. Some parts, such as the date and signature boxes, are self-explanatory - you have to note the date that the check was written and sign it as an anti-fraud measure. Other sections are a bit trickier to understand. The line that is marked "Pay to the order of" is known as the payee line, and is where you fill out the name of the person or organization that will be receiving the money from the check.
Below and to the side of that are two sections that are pretty similar. In the box on the right, you put the amount of money that will be transferred in numerical format (i.e. in the form of a number). You also list the amount below the payee line as well; however, here you need to write out the number as a word (for example, instead of $1000 you would write 'one thousand dollars'). The line marked "Memo" is an optional section for you to write about the reason for the check if you feel it to be necessary.
Finally, the back of the check has a space for "endorsements". This is where the recipient of the check needs to sign before the check can be deposited. There is a lot going on in a check, but understanding what each section is for makes it much easier to know what you're doing when it comes to filling it out.
Also read: How To Invest In Gold For Beginners
How To Fill Out A Check: A Step-By-Step Guide
Now that you know what each section of a check is for, you're ready to fill one out! This handy step-by-step guide will show you what you need to do in each stage of writing a check so you can transfer your money stress-free!
Step 1) Name The Recipient
First, you need to fill in the name of the person the money is going to. As mentioned above, this goes on the payee line marked with "PAY TO THE ORDER OF". Write the recipient's name in full, as it appears on their account. It's not the end of the world if you misspell it slightly or if it doesn't 100% match the name on the account, as most banks are pretty lenient when it comes to this. That said, it's much less hassle if it's written correctly.

Step 2) Fill In The Amount
This is where it's easy to mess up. You need to write out the amount you're paying twice, once in numerals and once as words. The numerals go in the separate box to the right of the payee line.
Then, write the number out as words on the line below the payee line. For example, if your check is for 50 dollars exactly, then you would write $50 in the box and Fifty Dollars Only on the line (you could also format the written version as Fifty and 00/100 Dollars).
If there is space left on the line or in the box, then you should draw a simple line to fill in the empty space. This is to prevent fraudsters from adding any more to the amount, like a few extra zeros.
Also read: Find Out How Much Life Insurance You Need!
Step 3) Say What The Check Is For
The line marked "MEMO" is there so you can fill in what the check is meant for. This is an optional step, but it's a recommended one. Writing a short description of why the money is being transferred will help you remember why you wrote the check as well as give the bank and recipient a bit of background information.
Also read: How To Budget Wisely With The Assistance Of Budget Apps
Step 4) Date And Sign
To finish off the check, you need to fill in the date at the top and sign on the indicated line. Use the date of when you wrote the check; it doesn't matter if it won't be cashed for a while - the date acts as a timestamp so the bank knows exactly when the check was written.
However, you can set a future date for the money to be transferred as long as you notify your bank about this in advance. This will defer the payment until the indicated date.
Finally, sign the check on the line at the bottom-right of the check. This is for security reasons, and the bank will be able to compare your signature to the one on file for your account to make sure it hasn't been forged for fraudulent means.
And there you have it! You've just written a check. All that is left to do now is for the recipient to endorse it with their signature on the bank, and for them to deposit it so the transaction goes through.
Also read: The 8 Amazing Passive Income Ideas With Little Money
Final Thoughts
While writing a check is nowhere near as common as it once was, there are still plenty of reasons why you need to know how to do it. Many utility companies, credit card lenders, and even some businesses will need a physical check when making payments. Checks are also good for security reasons, making it more secure to send money and leaving a literal paper trail so you can trace the money that you've sent if necessary. For more details on handling checks, including how to void them, you can refer to this guide to voided checks.
Whatever the reason you might have for writing a check, it is an important life skill to have. If you ever find yourself needing to write a check and you aren't sure exactly what you need to do, you can look back on this handy guide for all the answers you need!
Are you interested in creating high-quality pay stubs that are a breeze to generate? Then check out the paystub creator and get started today!